Even a strict office thing, which is constrained by the framework of the office dress code, can be varied, without violating the rules, with the help of voluminous decor in the form of small "flower" rows.

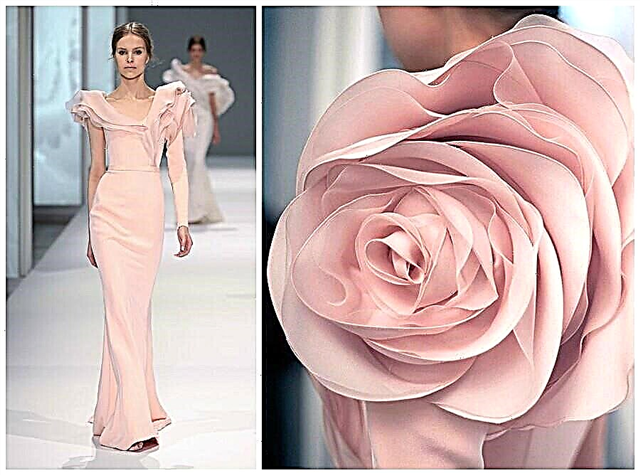
Light, romantic, dazzling decor, is found in the collections of one of the Russian brands. Depending on the materials used, it can be used to create a capacious, almost austere, accent or light floral cloud. Such decor is done manually, by sequentially adjusting many elements of different sizes, and is quite time-consuming.

Photo: rubancouture.com
In this workshop I will show you a quick and easy way to create a similar decor.
Marine watercolor: "exciting" decor with soft mesh braid
You will need:

- a cut or the remains of the fabric from which the decor will be made;
- tailor pins;
- chalk or washable marker for tissue;
- ruler;
- scissors;
- threads in the color of the main fabric, needle for sewing
Step 1. Product Preparation

It is convenient to carry out a similar decor on a part that is not yet connected to the product. But in my case, the product is almost ready, and the decorated part - the skirt - is already connected to the top.
The bottom of the skirt should be processed using the method you have chosen: overcast with an overlock, perform part of the hem or process a slice with an oblique trim.
How to sew an oblique edging: 3 ways

Mark the fold line with the hinged stitches, chalk or washable marker - we will focus on this line when setting up the decor.

Iron the stock along the marked bottom line. Unscrew back.

Using the chalk or an erasable marker on the front side of the skirt, we draw a “plan” for the decor - several lines at an equal distance from each other, which we will also focus on. My lines are located at a distance of 4 cm from each other, if you place them closer, the decor will be more dense and voluminous.
False hem on the bottom of the product
Step 2. Making decor


In order to start manufacturing decor elements, you need to understand how tightly you need to pick them up to get the desired result.
To do this, take a piece of fabric about 3 * 10 cm in size, lay a machine line in the center with a stitch length of ~ 5-6 mm with a minimum thread tension and pick it up to obtain the desired result, pulling the ends of the lower threads. Measure the length of the resulting element: 5 cm.
Thus, we calculated the coefficient of selection: 10 cm (initial length) / 5 (resulting length) = 2.
That is, it will be necessary to cut out decor elements 2 times longer than their desired length in finished form.
At this stage, it is important to consider the properties of the fabric from which the decor is made. I use medium-density cotton costume, and fitting of decor elements with a coefficient of 2 is suitable for me. If the fabric is thinner, for example, chiffon, then the assembly will be denser, and decor elements in cut will be longer.

Let's proceed to cutting out the decor elements. So that the resulting "petals" do not crumble, it is important to cut the decor elements at an angle of 45 degrees with respect to the shared thread.
The desired length of the decor elements in my product is 15 cm, therefore, taking into account the pick-up intensity defined in the previous paragraph, I will cut out elements 30 cm long.
To give the decor more volume from the bottom, I’ll make the bottom of the element wider, gradually tapering upwards, approximately to the middle of the element.
The photo shows the sizes of my parts, but you can cut them in other sizes.

Cut the part without allowances.

Using the resulting part as a template, cut out the desired number of decor elements.If you don’t have enough fabric to cut out the details of the required length, you can supplement them with separate rectangular pieces of the same width as the narrow part of the decor element (I have 3 cm), also cut along the oblique.

In addition, cut several long strips ~ 9 * 0.5 cm long, and ~ 5 * 0.5 cm. The strips are also cut at an angle of 45 degrees with respect to the shared thread.

Let's set up the decor.
To pick up the cut detail of the decor in the center, laying a machine line with a stitch length of ~ 5-6 mm with a minimum thread tension and picking it up to the required length (I have 15 cm), pulling the ends of the lower threads. Tie the ends of the threads tightly and leave uncircumcised.

Using tailor's pins, fix the decor element on the detail to be decorated, focusing on chalk marking. The wide side of the decorative part is located at the bottom of the skirt at a distance of ~ 1−5 mm from the bottom.

Stitch the resulting quilling in the center, laying the line exactly along the previously laid sewing line and gradually removing the pins.

The additionally cut narrow strips in the process of setting up the ruffle must be placed under the foot of the sewing machine, taking them into the seam, as shown in the photo. We complement the decor with long stripes in the wider, more voluminous part, and with short ones in the narrower.

The result was a stitched quirk of irregular shape with several strips of fabric located across the stitching seam. Now you can trim all ends of the thread.

It remains to complete the processing by cutting the ruff in several places across, not reaching 1-2 mm to the stitching line, thus, something like petals will turn out.

Secret:
to make the decor more voluminous and "shaggy", you need to incise in those places where the ruff bends upwards, as shown in the photo.

The first element of decor is ready. It can be slightly “ragged” and steamed with an iron.

If you want to extend a decorative element, it can be "completed" with the help of separately cut along oblique and gathered narrow strips of fabric.

Similarly, process all other parts of the decor.
Pick up.

Fix on the decorated part, according to the previously marked markings.

Stitch decor elements on the part to be decorated. Do not forget about the additional "petals" - strips cut separately.

Notch ruffles in places of bending up.
Feather and feathers: do-it-yourself fashionable clothing decor
Step 3. Processing the bottom

After the decor is ready, you can process the bottom of the product. I decided to sew hem with hidden stitches.


The decor is ready!

Thus, you can decorate almost any elements and individual details of clothing.
In this master class, I decorated the bottom of a simple sundress and a tied belt:
- Best-seller
- Special offer

- 1
- 2
- 3
- 4
You can also use for decoration any other simple models from Burda:
- Best-seller
- Special offer

- 1
- 2
- 3
- 4
- Best-seller
- Special offer

- 1
- 2
- 3
- 4
The author of the master class and photo: Daria Tabatchikova

By education, Daria is a PR specialist and economist, but several years ago she devoted herself entirely to her favorite business - sewing.
She studied sewing from magazines, books and using the Internet, there are also sewing courses in the arsenal, but Daria considers herself self-taught.She loves to study specialized sewing literature from different years and countries, and then put her knowledge into practice.
At the end of 2017, Daria became the winner of the festive contest from BurdaStyle.ru.
She leads her Instagram page and VKontakte group.
Material prepared by Julia Dekanova